Travel maps with pins are physical or digital maps where travelers mark visited destinations, dream locations, or planned routes using pins, stickers, or digital markers. They serve as a visual travel journal, trip planning tool, and wall décor all in one helping you see your journey at a glance and stay motivated to explore more of the world.
There’s a moment every passionate traveler knows standing in front of a map, finger tracing routes across continents, heart already ahead of the body. Travel maps with pins turn that feeling into something tangible. They transform a list of cities into a story on your wall, a record of everywhere you’ve been and a roadmap to everywhere you’re going next.
But here’s where most people get stuck: they buy a beautiful push pin travel map, hang it up, and realize they have no idea how to organize it, which pin colors mean what, or how to make it actually useful for planning future trips. Others search for the right digital option and get overwhelmed by choices.
This guide solves all of that. If you’re building a wall display to show off a lifetime of U.S. road trips, planning your next National Parks adventure with a paper map and colored pins, or setting up a digital travel map to share with friends you’ll find exactly what you need here. From choosing the right map style to organizing your pins like a pro, this is the only travel map guide you need.
What Are Travel Maps with Pins and Why Do Travelers Love Them?
Travel maps with pins are maps, physical or digital, where travelers use markers to track visited places, plan future destinations, or visualize routes. Physical versions use push pins or stickers on framed maps; digital versions use platforms like Google Maps, Visited, or Wanderlog. Both serve the same core purpose: making your travel history visible and your future plans concrete.
The appeal goes deeper than aesthetics. Psychologists who study goal setting consistently note that visual progress tracking increases motivation and follow through. For travelers, a pin map shows exactly that every new pin represents a real accomplishment and reinforces the identity of being someone who explores. No wonder push pin travel maps have become one of the most popular travel themed home décor items in the U.S., with consistent demand on platforms from Etsy to Amazon.
Physical vs. Digital Travel Maps with Pins: Which Is Right for You?
Physical pin maps work best as wall art and conversation starters, while digital maps offer shareable, searchable, always updated trip tracking. Most serious travelers eventually use both one for display, one for planning. The right choice depends on how you primarily use your map.
| Feature | Physical Pin Map | Digital Pin Map |
| Visual impact | High wall art quality | Medium screen based |
| Ease of updating | Low manual pin placement | High instant updates |
| Trip planning tools | None built in | Routes, notes, sharing |
| Cost | $25–$150+ one time | Free to low monthly cost |
| Shareable with others | Not easily | Yes, instantly |
| Works without internet | Yes | No (most platforms) |
| Customization | Color coded pins, legend | Tags, categories, photos |
Who Should Choose a Physical Pin Map
Physical maps shine for travelers who want a home or office display, couples tracking trips together, families with kids who love the tactile experience of placing pins, and anyone who loves analog aesthetics. A large framed push pin map of the United States hung in a living room or travel office becomes an immediate conversation piece and a daily reminder of adventures taken and planned.
Who Should Choose a Digital Travel Map
Digital maps suit frequent travelers who want searchable records, anyone planning complex multi-destination trips, travelers who want to share routes with companions, and people who move homes often (no need to rehang a physical map). Platforms like Google Maps’ “My Maps,” Wanderlog, and the Visited app let you drop pins with photos, notes, and ratings attached to each location.
Types of Physical Travel Maps with Pins
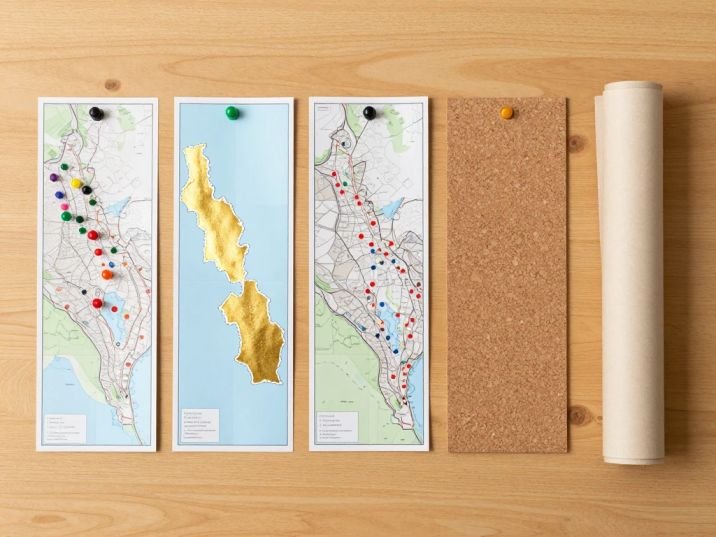
Physical travel maps with pins come in five main styles: push pin maps on canvas or foam board, scratch off maps, framed print maps with adhesive stickers, cork board maps, and rolled paper maps. Each has different display qualities, durability, and pin holding capacity.
Push Pin Maps on Canvas or Foam Board
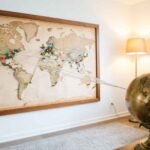
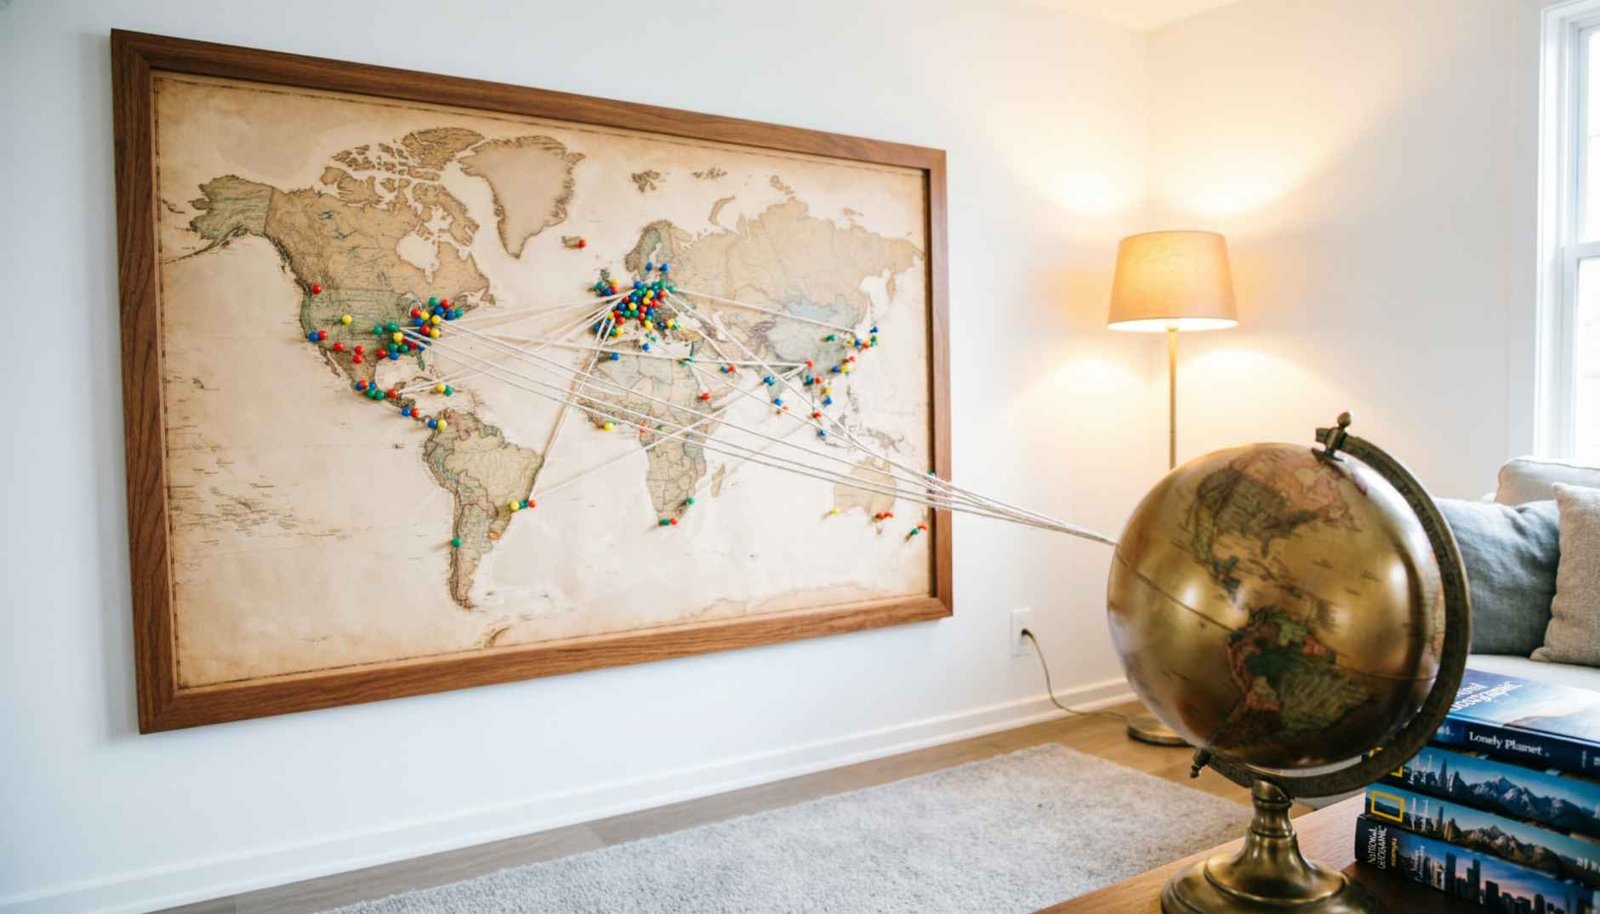
These are the most popular style. A printed map often mounted on canvas stretched over a wooden frame uses a foam or cork backing that holds standard push pins securely. Canvas maps look the most polished as wall art and hold up to heavy pin use over years of travel. Sizes typically range from 24×16 inches to massive 48×32 inch versions for serious collectors.
Best for: Living rooms, home offices, travelers with many destinations already pinned
Scratch Off Travel Maps
Scratch off maps feature a gold or silver foil layer over each country or U.S. state. You scratch off the foil as you visit each place, revealing a colorful map underneath. They’re highly satisfying and visually dramatic though they don’t allow the same flexible color coding system that pin maps do.
Best for: Visual impact, gifting, travelers who want a simple “visited/not visited” system
Cork Board Travel Maps
They mount a printed map onto a thick cork surface, allowing standard push pins to hold easily. Cork boards also let you pin photos, postcards, ticket stubs, and notes alongside your destination pins making them more of a travel memory board than a pure map display.
Best for: Travelers who want to combine map pinning with travel memorabilia display
Framed Print Maps with Sticker Dots
These use adhesive dot stickers rather than physical push pins. They’re ideal for households with young children (no sharp pins), renters who want wall art without the risk of pin holes in the frame area, and travelers who prefer a cleaner look. Sticker dots come in multiple colors, enabling the same color coding systems as push pins.
Best for: Families with kids, renters, travelers who prefer a no puncture option
How to Set Up Your Travel Map with Pins: Step by Step
Setting up a travel map with pins takes about 30–60 minutes for a physical map. Choose your map size and style, mount it securely, select a color coding system for your pins, and start placing pins beginning with places you’ve already visited before planning future destinations.
Follow these steps for a clean, organized result:
- Choose your map and size For U.S. road trip trackers, a detailed United States map (at least 30×20 inches) gives enough space to pin individual cities without crowding. World map versions work better at 36×24 inches or larger.
- Mount it at eye level The center of the map should sit at approximately eye height (around 57–60 inches from the floor), the same standard used in galleries and museums.
- Decide on your pin color system before placing a single pin This is the step most people skip, and it creates confusion later. Establish your system first (see the section below).
- Start with visited destinations. Place all your past travel pins first to see your progress immediately. This anchors the map emotionally and gives you a baseline.
- Add planned destinations Use a distinct color for places on your bucket list or upcoming itineraries.
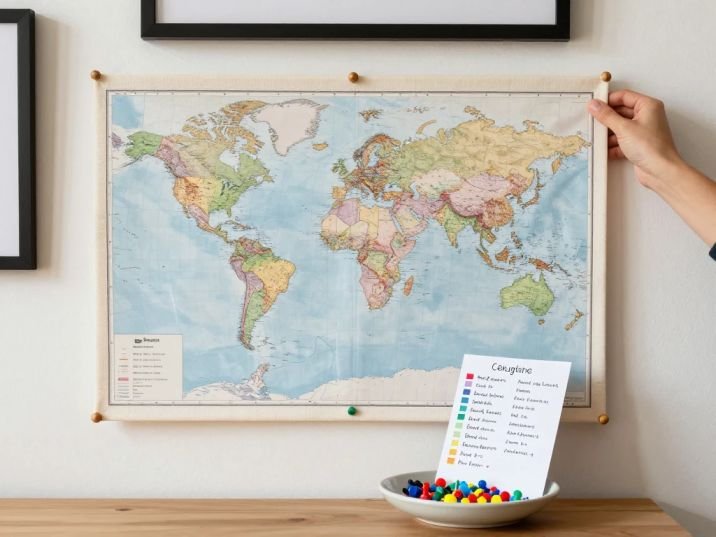
- Create a small legend card Mount a small card in the corner of the frame or on the wall beside the map explaining your color system. Future guests (and future you) will appreciate it.
- Photograph your map periodically A quarterly photo creates a time lapse record of your travel growth over years.
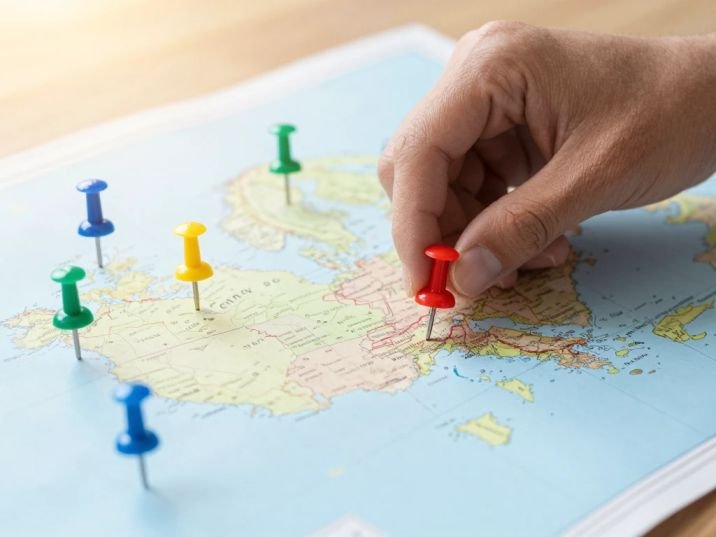
Pin Color Coding Systems That Actually Work
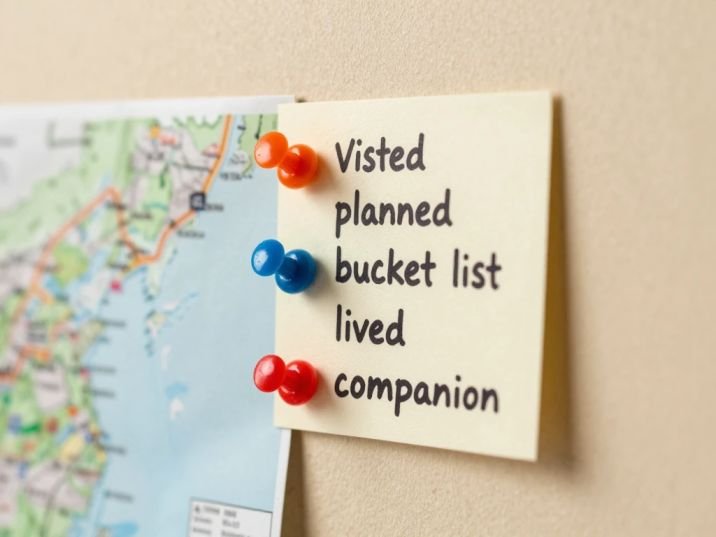
The most effective pin color coding system uses 3–5 colors with clear, memorable meanings for example: red for visited, yellow for planned, green for bucket list, blue for lived/stayed long term, and white for places a travel companion has visited but you haven’t yet.
Color coding transforms a simple travel display into a meaningful planning tool. Here are the most popular systems used by experienced map collectors:
The Classic 3 Color System
- Red: Places you’ve visited
- Yellow: Places you want to visit
- Green: Places on your bucket list (dream destinations, not yet planned)
The Traveler’s Planning System
- Red: Visited
- Blue: Currently planning (flights booked or actively researching)
- Yellow: Someday list
- White: Lived or stayed for an extended time (1+ month)
The Couples or Family System
- Red: Both/all have visited together
- Blue: One partner has visited solo
- Yellow: Next trip planned together
- Green: Individual bucket list items
Pick a system that fits your situation and stick with it. The biggest mistake map owners make is starting without a system and creating a visual jumble they can’t interpret six months later.
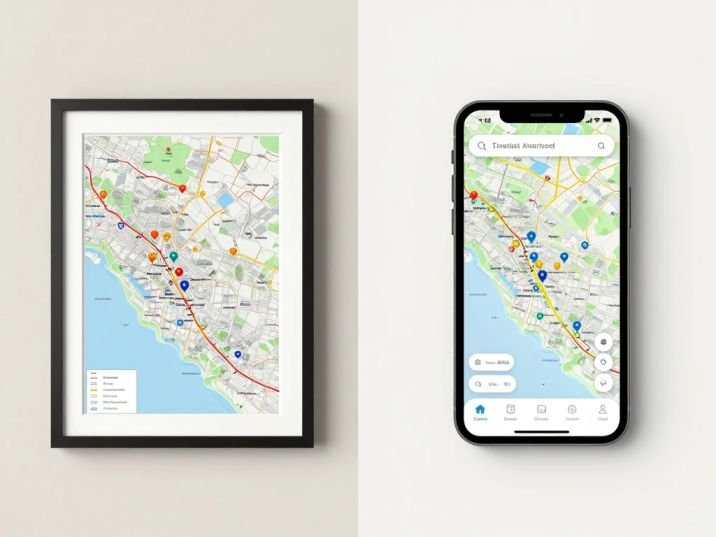
Best Digital Travel Map Apps and Platforms
The best digital travel map platforms for U.S. travelers are Google Maps (My Maps), Wanderlog, Visited, Been, and Polarsteps each offering different strengths from trip planning to automatic journey tracking. All offer free tiers with useful features.
Google Maps My Maps
Google’s free “My Maps” tool lets you create custom maps with color coded pins, add photos and notes to each location, draw routes, and share maps with anyone. It integrates with Google Drive and works on any device. For collaborative trip planning coordinating a group road trip across multiple national parks, for example My Maps is hard to beat. Access it at mymaps.google.com.
Best for: Trip planning, group travel, route mapping
Wanderlog
Wanderlog is purpose built for trip planning. It lets you drop pins on an interactive map, build day by day itineraries, import flight and hotel confirmation emails automatically, and collaborate with travel companions in real time. The free version covers most needs; the premium tier adds AI powered optimization for road trip routing.
Best for: Detailed trip planning, itinerary building, group travel coordination
Visited and Been
Both apps focus specifically on tracking visited countries, U.S. states, and cities. They generate percentage statistics (“You’ve visited 23% of U.S. states”), visual heat maps of your travel history, and shareable graphics for social media. Simple, clean, and satisfying for travelers who love seeing their progress quantified.
Best for: Tracking visited places, sharing travel stats, visual travel history
Polarsteps
Polarsteps automatically tracks your location during trips (with your permission) and builds a visual journey map with photos and travel statistics. It’s the closest digital equivalent to a travel journal all your trips become stories on an interactive map. Many long term travelers use it as both a personal record and a shareable travel blog.
Best for: Long term travelers, automatic journey tracking, travel journaling
Best Travel Maps for U.S. Road Trips and National Parks
For U.S. road trip planning, detailed state by state maps with National Park Service locations, Interstate Highway systems, and scenic byways give the most useful combination of planning detail and visual reference. National Geographic’s U.S. Road Atlas and NPS visitor maps are the gold standard for paper planning.
The U.S. National Park Service manages 63 national parks across 30+ states and many dedicated road trippers use pin maps specifically to track their national parks progress. The NPS website (nps.gov) offers free downloadable maps for every park unit, and their “Find a Park” tool functions as a digital pin map of the entire national park system.
Scenic Byways Worth Mapping
When building a U.S. road trip pin map, consider marking these designated scenic routes alongside destination pins:
- Route 66 Chicago to Santa Monica, passing through Illinois, Missouri, Kansas, Oklahoma, Texas, New Mexico, Arizona, and California
- The Blue Ridge Parkway 469 miles through Virginia and North Carolina, connecting Shenandoah National Park to Great Smoky Mountains National Park
- Pacific Coast Highway (Highway 1) California’s coastal route from San Francisco to Los Angeles
- Going to the Sun Road Glacier National Park, Montana (seasonal typically open late June through mid October; verify with NPS)
- The Loneliest Road (U.S. Route 50) Nevada’s remote, dramatic cross state route
How to Use Travel Maps with Pins for Trip Planning
To use a travel map with pins for active trip planning, designate specific pin colors for “researching,” “booked,” and “completed” stages then update pins as each stage progresses. This turns the map into a live planning dashboard rather than just a record.
Physical pin maps can function as surprisingly effective planning boards when used intentionally. Here’s a system that works:
- Drop a pin on your target destination in your “planning” color the moment a trip idea forms
- Swap it for a “booked” color once flights or accommodations are confirmed
- Add a “completed” pin after the trip ideally on the day you return, while the memory is fresh
- Note key details for digital maps, attach a note with your accommodation name, favorite restaurant, and one memorable detail. For physical maps, keep a travel journal or notebook cross referenced by city name.
This system ensures your map serves you before the trip, not just as a retrospective display after it.
Travel Maps with Pins as Gifts: What to Know Before You Buy
Travel maps with pins make excellent gifts for frequent travelers, newlyweds planning honeymoons, recent graduates, and families tracking vacations but choosing the right style, size, and personalization level matters significantly. A generic small map looks underwhelming as a gift; a large, personalized version with a custom legend makes a lasting impression.
Gift Buying Tips
- Size matters most A map smaller than 24×16 inches looks cramped with many pins and loses visual impact as wall art. Go larger if budget allows.
- Include starter pins Many maps ship without enough pins in the right colors. Add a set of 200–300 mixed color push pins to any physical map gift.
- Consider personalization Many Etsy sellers and specialty retailers offer maps customized with a couple’s names, a family name, or a home city marker already placed.
- Check the frame quality Maps mounted in cheap plastic frames look noticeably less impressive than wood framed versions. The frame upgrade is often worth the extra cost.
- Scratch off maps make lower risk gifts If you don’t know the recipient’s home décor style, a scratch off map is universally appealing and easier to place in any room.
Common Mistakes People Make with Travel Maps and Pins
The three most common travel map pin mistakes are starting without a color system, choosing a map too small for the wall space, and placing the map in a location with direct sunlight which fades printed maps quickly.
Mistake #1: No Color Coding System from the Start
Dropping pins without a defined system feels fine at first, then becomes an unreadable cluster of mixed colors with no clear meaning. Once 30+ pins cover a map, retroactively assigning meaning to random colors is nearly impossible.
Fix: Decide your color system before placing the first pin. Write it down. Post a small legend on or beside the map.
Mistake #2: Buying a Map Too Small for the Wall
A 12×8 inch travel map looks like a poster from a discount bin when hung on a standard living room wall. Pins crowd together, city labels become unreadable, and the visual impact disappears.
Fix: Measure your wall space first. For a solo feature display, go at least 30×20 inches. For a gallery wall arrangement alongside other art, 24×16 inches can work. When in doubt, size up.
Mistake #3: Hanging the Map in Direct Sunlight
UV light fades printed maps, especially the vibrant colored versions popular in push pin sets faster than most people expect. A south facing window can noticeably fade a map within a year.
Fix: Hang your travel map on a wall that receives indirect light or no direct sun. If sunlight is unavoidable, look for UV protective glass framing options.
Insider Tips for Getting More Out of Your Travel Pin Map
Five things experienced travelers do with their pin maps that most guides never mention:
Create a “home base” pin Mark your home city with a distinctly different pin (a star shape, a different color, or a flag pin). Every trip radiates outward from that point, which makes the visual storytelling more powerful.
Use string to show routes For road trips or multi stop journeys, connect destination pins with thin string or thread in the same color family as your visited pins. This transforms individual destinations into a visual journey narrative.
Date your pins with small labels Tiny numbered labels (01, 02, 03…) on pins, cross referenced to a notebook, let you track the chronological order of your travels, a detail that becomes fascinating 10 years later.
Layer seasonal travel data Use different pin shapes (round, star, heart) to note seasonal travel: beach trips, ski trips, cultural festivals. This reveals patterns in your travel style you might not notice otherwise.
Photograph the map every New Year’s Day An annual map photo creates a year over year visual record of your growing travel history. Ten years of photos become a remarkable personal document.
Where to Display Your Travel Map for Maximum Impact
The best locations to hang a travel map with pins are living rooms, home offices, entryways, and dedicated travel or reading rooms places with consistent indirect lighting, high foot traffic, and enough wall space for the map to breathe.
Avoid bathrooms (humidity warps paper maps and loosens adhesive backings) and kitchens (cooking fumes and grease affect paper maps over time). Bedrooms work well for personal maps, especially for solo travelers who enjoy having their travel history as the last thing they see before sleep.
For renters or frequent movers, consider a map mounted in a frame with an easel back it displays on a bookshelf or desk without any wall mounting at all, and moves easily between homes.
Underrated Alternatives to Traditional Travel Maps with Pins
Three underrated alternatives to standard push pin maps are vintage style travel ledger notebooks with hand drawn maps, 3D raised relief maps with pin capability, and personalized city or region maps that zoom in on a specific area you know deeply.
Most travelers gravitate toward standard flat world or U.S. maps but these alternatives offer something more distinctive:
- 3D Raised Relief Maps: These topographic maps show elevation physically, making mountain destinations, canyon regions, and coastal areas visually dramatic. They work especially well for hikers and outdoor adventurers tracking National Parks visits.
- State or Region Deep Dive Maps: Instead of one world map, some collectors keep a detailed map of their home state or most traveled region like a detailed map of New England or the American Southwest where they can pin every small town, trailhead, and back road discovery.
- Custom Illustrated Maps: Artists on platforms like Etsy create hand illustrated maps of specific cities, neighborhoods, or regions. A custom illustrated map of, say, the Colorado Rockies or the Florida Keys makes a far more personal display than a standard atlas style print.
FAQs
What size travel map with pins should I buy?
For most home displays, a map of at least 30×20 inches works best large enough to read city names clearly and place pins without crowding. World maps benefit from going even larger (36×24 or bigger) since they cover more geographic area. For a desk or bookshelf display, 18×12 inches is the practical minimum. Always measure your intended wall space before ordering.
What kind of pins work best for travel maps?
Standard 1/2 inch push pins work for most canvas and foam backed maps. For cork board maps, standard thumbtacks also work. Map tacks with round colored heads (3mm–5mm diameter) offer the cleanest look and are available in multipacks of 10+ colors. Avoid pins with large decorative tops for detailed maps; they physically cover too much geography when placed close together.
Can you frame a travel map with pins?
Yes, but the frame needs a deep enough profile to accommodate the pin depth typically at least 3/4 inch to 1 inch depth. Deep shadow box frames work best. Standard flat frames don’t leave room for pins. Many canvas mounted push pin maps come with a wooden stretcher frame built in, which is the most common and convenient solution.
What’s the best free app for tracking countries and states visited?
The Visited app and Been are both free, easy to use, and purpose built for tracking countries and U.S. states visited. Both generate statistics and shareable graphics. For more detailed trip planning alongside tracking, Wanderlog and Google My Maps offer more features at no cost. All four are available on iOS and Android.
Are travel maps with pins good for kids?
Absolutely. Physical push pin maps engage children’s spatial thinking and make geography tangible and exciting. For safety with younger children, use adhesive dot stickers instead of sharp push pins they offer the same visual color coding without the sharp point hazard. Many families use a shared family travel map as an educational tool, letting kids place the sticker for each destination they visit together.
How do you hang a heavy framed travel map without damaging walls?
Use heavy duty picture hanging strips (like Command Large strips rated for the map’s weight) for rentals or drywall situations. For heavier framed maps (over 5 lbs), anchor into wall studs using appropriate screws and picture hanging hardware. Most wood framed canvas maps include hanging hardware. Always verify the weight rating of your hanging hardware matches or exceeds the map weight.
What’s the difference between a push pin map and a scratch off map?
Push pin maps use removable pins to mark locations in any configuration, making them flexible and updateable over time. Scratch off maps have a foil coating over each country or state that you scratch away when you visit. It’s a one time action per location and can’t be undone. Push pin maps offer more flexibility and detail; scratch off maps offer more dramatic visual impact with a satisfying tactile element.
Conclusion
Travel maps with pins do something: no spreadsheet or photo album can put your entire journey on one surface and let you see the shape of a life spent exploring. Three things to take away: choose between physical and digital based on how you actually use maps (display vs. planning), establish your pin color system before placing a single marker, and size up rather than down when buying a physical map.
The right travel map becomes more than décor. It becomes a conversation about where you’ve been, a plan for where you’re going, and a daily reminder that the world is bigger and more accessible than it sometimes feels. Start with where you’ve already been. You might be more well traveled than you realize.
Pick your map, claim your pins, and let the wall do the bragging.